Hello and welcome to Charlie’s Lessons for English teachers. There are a lot of digital teaching tools out there and it can be tough to decide which one is best for a classroom. So, in today’s post, we are going to look at a popular lesson planning platform called Nearpod.
In this Nearpod tutorial for teachers, we will look in-depth at what the website offers, the different subscriptions available and how to get set up on the platform. On their website, they claim that their mission is to make teaching easier and that you will wonder how you ever taught without it. So let’s find out if that is true!
What is Nearpod?
Teachers and presenters used to heavily rely on Microsoft PowerPoint to teach or dictate their presentation or their lesson to their class. Nowadays, PowerPoint and Google Slides still really only contain text and images, which is not very inspiring for your class or your audience. So Nearpod is an attempt to solve the old adage death by PowerPoint.
It transforms lessons by allowing us to create interactive digital presentations, videos, games and activities. Students can then interact virtually with these Nearpod lessons in classes or on their devices in person. We can then review interactive Post-Session Reports to examine details of how well our students engaged with the lesson to enhance our teaching going forward.
Nearpod actually featured in my top apps for teacherrs for 2021. Want to know what other apps made the list? Check them out here.
How much is Nearpod for teachers?
There are a lot of posts out there that are outdated when it comes to Nearpod’s pricing plan and features. So, it is worth noting that the add-on for Google Slides is now exclusively for Gold users. For this tutorial, we will be focussing on the Silver plan for individual teachers, which is free and allows us to use a lot of the facilities. With this package, we get standard features and functionality, 100 MB of storage and up to 40 students joining each lesson.
The Nearpod Gold plan is $159 per year and increases to 1GB of storage, 75 students per lesson and additional features including Google Slides. A Platinum plan is $397 per year and extends to 5GB of storage, 90 students and further features. You can also apply for the Premium Plus plan as a School or District, which is POA. This allows you to include up to 250 students per lesson, unlimited storage and full use of the new release features.
How do you create a Nearpod from scratch?
To create a Nearpod from scratch is very simple. Firstly, we are going to log in as a Teacher to create our fun interactive lesson and not as a Student. Now we select Create and then Lesson. Here you can see everything that the Silver plan account offers us. Now we select add Content & Activities and we’ve got 12 different forms of content that we can add to our lesson.
Nearpod Content
In the Content section, the most impressive options for me are Nearpod 3D and the VR Field Trip.
With Nearpod 3D we can now add a wide selection of 3D models to our lessons. If we look at the Ancient Times section, for example, there’s an Apatosaurus, Aztec Temple or a Castle. For now, we are going to select the Aztec Temple for our Nearpod. Once we have saved this option to our lessons, this function enables us to look up close and in detail in 360° at the temple through the viewer.
For the VR Field Trip, we can go to Venice, Machu Picchu and many more options. There are loads of great places where you can study virtually, but for this tutorial, we will select Venice. As with the 3D image function, once we have saved this lesson we can look at Venice in great detail. So, we can use your students’ imagination and ask what they can see, what is happening, and so forth.
Now that we’ve looked over the Content section, let’s work through the Activities section.

Nearpod Activities
So, we go back to the Content & Activities section and select Content.
There are 10 different Silver options to select from here. So to make it easy, we’ll focus on two areas that work really well – Matching Pairs and Draw It.
In Matching Pairs you can make up your own version, or select a ready-made option from the library on the right. To make your own Matching Pairs, let’s use Transport to teach our kids all of the different modes of transport that there are in English as a topic example.
- We can add an image – so let’s select a car
- We can then add text to describe the image and add three more
- Now that you’ve made three, click save
- In our Student Preview, we can now see the game itself and see how the students will be able to interact with it
Now, let’s take a look at Draw It – this is also nice and straightforward. We can add Instructions in the text box, as well as add images, audio or other media. For this lesson, I would as ‘What is your favourite mode of transport?’ We can also set a timer and a background image for our students to draw on. To keep it simple, I would just leave the background image blank, but there are lots of options to choose from. Now, our students can draw their favourite mode of transport using their devices.
Another great way to give presentations is to use Powerpoint. If you do use Microsoft’s popular presentation tool, then read this post here.
The ready-made Nearpod Library
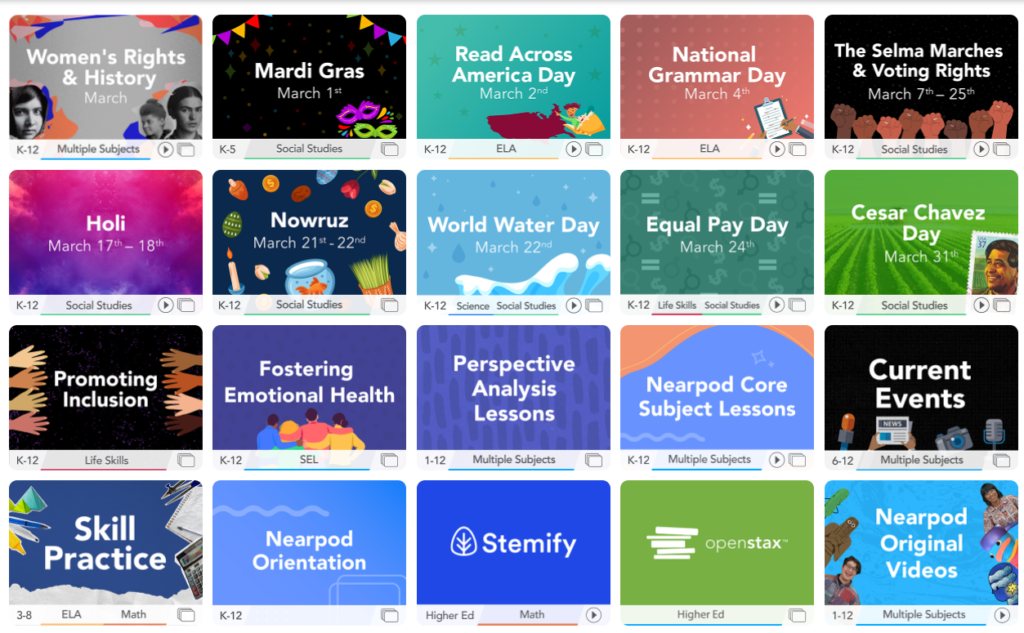
If you are a teacher like me, you won’t always have time to make a Nearpod from scratch. So here we are going to look at the Nearpod Library in more detail. Starting at the Nearpod Homepage we can select the Nearpod Library. Now we can either search for what we are after or pick from Featured, Videos, Activities, Lessons or By Publisher.
The Videos contain questions at certain points for our students to interact with. Activities are focused on the activity slides that we ran through earlier. These Lessons are designed for us to take the whole class through various slides that should run through the duration of the entire period. To the left, we can filter through exactly what we are looking for.

One of the great things about Nearpod for me is that we can select Nearpod lessons, duplicate them and edit them so that they reflect exactly what we want to teach our students. An example of this is searching for Take A Trip. This was great for my classes in the time of the pandemic we found it a great opportunity to look at and examine other countries.
To use this function and make this Nearpod our own, we firstly select England and we can then add this to My Lessons. Select Show In Lessons and then select Edit and Duplicate it first. This breaks down the lesson into all of the different slides and activities that are contained here. So, we can now delete, edit or add any slide that we would like to.
How do we incorporate Nearpod into our lessons?
So, now that we have seen a Nearpod build from scratch and one taken from the Library, we can look at using this as a teacher in our class. Back at the Nearpod Homepage, we make a Lesson selection and select Live Participation. This will then display a code that our students can use to join at join.nearpod.com or via the app.
Most of my students use their phones or tablets to connect to the lesson. So, we will need to think about what devices the students are using and what kind of activities we will be asking them to do to prevent it from getting too fiddly for them.
Once they have entered the code they will then be asked to write their name and join the lesson. They cannot jump forward in the slides, which is something that I quite appreciate. Back in the teacher’s view, we can see the names of the students who have entered the classroom. As we move across each slide, so the student’s device follows. Teachers can then also show good examples of work to the class, as well as see work in progress and work that has been submitted.
The Time To Climb assessment game

I have saved the Time To Climb game for the final part of this post because it is a great way to assess and measure our students’ understanding of the lesson. To get Time To Climb going we head back to the Nearpod Homepage, select Create and then Lesson. Select Content & Activities and then select Activities and Time To Climb. Here we can include our assessment questions and answers, and pick a fun background. The student can choose a character that then appears on both screens. As they answer the questions correctly they can accumulate points and move further up the hill.
Final thoughts
So, there you have it. Nearpod offers a fantastic array of fun activities for teachers to interact with and assess their students. I hope that you enjoyed this Nearpod teacher tutorial. Let me know in the comments below if you are going to use Nearpod in your next lesson.
You can keep up to date with all of my latest blog posts by following me on Facebook, Twitter, Instagram or TikTok.
