Hello, welcome back. In this post e are taking a look at what is still the best LMS for you and your students: Google Classroom.
So why is Google Classroom still the best LMS for you and your students? It’s because, firstly, it’s completely free. Also, it’s really easy to use. This makes it great for teachers and also for our students. So let’s get started with how we use Google Classroom.
How to make a class in Google Classroom
So the first thing we’re going to do is go to the Apps Launcher and go to Google Classroom. We can either create a class or join a class. We’re going to look at “Create a Class” as we’re looking at this from the teacher’s perspective. So go to “Create Class” and we’re going to have to come up with some information about the class. Now, to be honest, the most important thing is just a class name. The rest of the information is really up to you—what you want to put. Once we have a name, we just go to “Create.” And now our Google Class is open.
How to make a Google Classroom header in Canva
One of the first things you might want to do is customize your classroom so it’s unique for you and your students. So to do this, we’re just going to go to “Customize.” We can choose a photo of some Google Classroom photos that they offer you, or we can go to “Upload photo.” If we go to the settings gear in the top right-hand corner, we can change the name again, just in case you’re not happy with it.
A tip for you is to go and use Canva to create a Google Classroom banner or header. To do this, go to Canva and search for “Google Classroom header.” Then, select a blank canvas. Once you’re finished with your Google Classroom header, go to “Share,” then “Download.” After that, return to your Google Classroom, go to “Customize,” and then to “Upload.” You will then be able to find the header you just made.
How to add students in Google Classroom
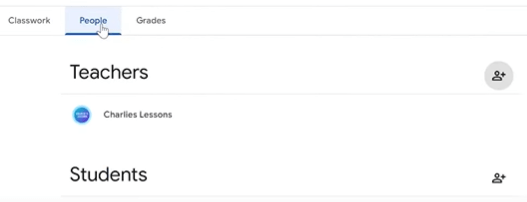
Now what’s missing? Our students! To get them in, we’re going to have to follow these steps. So at the very top, we go to “People.” The first way we can add students is to go to the plus sign and start adding students’ email addresses through here.
The second way we can add students is once the students have logged in and gone into Google Classroom. We can give them this code. We could also go to the settings button here and scroll down, and we can find all the information we need to be able to invite students to our Google Class.
Once you have students joining your Google Classroom, this is a very important setting that you need to take a look at. Go to the settings button again and scroll down to “Stream,” and here you can select between three options. Now obviously, it’s up to you; it depends how much you trust your students. You can choose between giving them complete control on the stream, which is to post and comment on anything, or you can go to the other extreme, which means that you as a teacher control everything. I would probably start with “Only teachers can post or comment” and then slowly, as the students get used to how Google Classroom works, move on to the more “free” setting for your students.
How to add co-teachers in Google Classroom
When you’re in Google Classroom, us as teachers, we might feel a little bit lonely. So let’s look at how we add teachers to the Google Classroom. To do this, we go to “People” again, because remember, teachers are people too, and we go to the plus sign here and again we just start typing in the name of the teacher we’d like to add to our Google Classroom.

Just a word of warning: When you are inviting students or teachers, if their email addresses contain a domain that’s linked to a company, organization, or school, you may not be able to invite them. Always try and use Gmail accounts because these will have zero problems.
How to use announcements in Google Classroom
Once we have teachers and our students in our classroom, we can begin to interact with each other. So the first place we interact with our students is on the classroom stream. Now, to mention something or to post something as a teacher, go to the section where it says “Announce something to your class.” And here we can send a message. Now, this could be maybe something about a change of classroom or maybe a change in the date of a certain assignment. But here we can send a message to our students, and also we could even include a Drive file link to a YouTube video, upload a file directly, or even send a link to a website.
Now, these can be things that maybe every now and then you want to share something directly with your students, and you can use this announcement feature to do that. Also, we might want to select students who do see these announcements and others which we don’t want to see these announcements. So if we go to “All Students” (now in this case, I don’t have anyone included in the class, but in if we went to here, we would be able to see a list of all the students who are in the classroom, and we could select ones or deselect others), and this way we could control who and who can’t see what you’re posting on the stream as announcements.
How to set assignments in Google Classroom
The next place I would like to show you is “Classwork.” Now, this is where all the assignments, homework, any activities you’d like to set your students, this is where you’re going to go first. So go to “Classwork” and then to “Create.” So here we have a number of different assignments: from quizzes, questions, the ones that I use the most are “Material.” So I’m going to show you how those work. So once we go to “Create Material,” we’ll be presented with a title and a description, and then we can begin to add the material that’s going to be necessary for our students to complete the task.
Now, you could upload something like a reading task, link to a website that contains a video, and so in the description, you’re going to be including the instructions that you would like to give your students to be able to complete the task. Once we have completed all the information we’d like to add, then we’re just going to go to the right-hand corner up here and just go to “Post.” Alternatively, if we’re not ready to post it, we can go to “Save as a draft,” or even if it is ready, but you just want to post it maybe tomorrow or a week later, you can go to “Schedule.”
How to make topics in Google Classroom
One of the most important things for us as teachers is keeping Google Classroom organized so that when new students join, they can see exactly where everything is. And the key part of this is creating topics. Now, topics are groups where you can put material together and group it by a certain topic. And so to do this, go to “Create Topic” and start adding topics. So, for example, “Reading” would be an example. And once we’ve created “Reading,” let’s go to “Create Material,” and now you can see on the right-hand side we have an option to create material under the topic of “Reading.”
So when you take on a new class with new students, giving them a platform like Google Classroom full of resources, each grouped by topics, can be a really quick and easy way for students to get the practice that they need when they’re not in class with you.
Give your students everything they need
If you’re looking for websites to share with your students to give them the practice they need, then why don’t you check out my resource called “50 Websites English Teachers Should Know”?
Thank you for reading this tutorial on how to use Google Classroom for teachers.

Informação muito útil, obrigado!
Comments are closed.