
Hello and welcome back to Charlie’s Lessons for English teachers. Today we are going to look at five great ideas for using Padlet with ESL learners. Padlet is an online collaborative creative platform for both teachers and students,
What I love about this platform is that students can share their thoughts and ideas easily while getting creative. Plus, the standard version is free! So here we are going to look at how to use Padlet in the classroom as well as my favourite five different ways that we can teach using this fun online learning tool.
Using Padlet for the ESL classroom
To sign up for Padlet, we have a range of options to log in. Once you are logged in, this takes us to our Dashboard. On the left-hand side of our Dashboard, we can then select from Recents, Made, Shared, Liked and Archived. To create a New Folder would require us to upgrade from the current free plan, so we cannot use that.
At the top, we can select Make A Padlet, Join A Padlet, or use the Gallery. The Gallery is full of great examples from the Padlet team, as well as the user community. We can then use or repurpose these for our own classroom.
Free vs Pro Padlet
With a free Padlet account, we can make up to three Padlets at any one time with up to 500MB of data. We also only get up to 20MB of data, so I tend to just delete the oldest Padlet that I have running. To create more Padlets at one time, we can upgrade to either a rolling £10 monthly account. Or, we can choose a £96 annual account, which is the equivalent of £8 per month and can be cancelled anytime at the time of writing.
Five great ideas for using Padlet with ESL learners
1. The Map Padlet
To create a Map Padlet, we will go to Make a Padlet and choose Map from the eight available options. On the right-hand side, we then have a series of additional options. Select any map style and select Go. I use this map Padlet in my class is to practice comparative phrases. So, I have my students select cities in Europe and select comparative phrases about those cities. For example, Murcia isn’t as popular as Madrid. Or, FC Barcelona is worse than Real Madrid. Or, Granada is colder than Malaga. These examples are all student contributions.
To get a student to contribute to any Padlet, we can share it with them either via a QR code, emailing them directly or sharing it on Google Classroom. To contribute to this particular Padlet, they can open the link, click in the top right-hand corner and add a post. Then they will need to search for a place and add a sentence of the target language that you would like them to practice.
If we have a new class with students from different places, we can ask our students to share information about where they are from on the map as a nice way to introduce themselves. Alternatively, if our students have recently had a holiday they can share fun information about where they went and what they did.

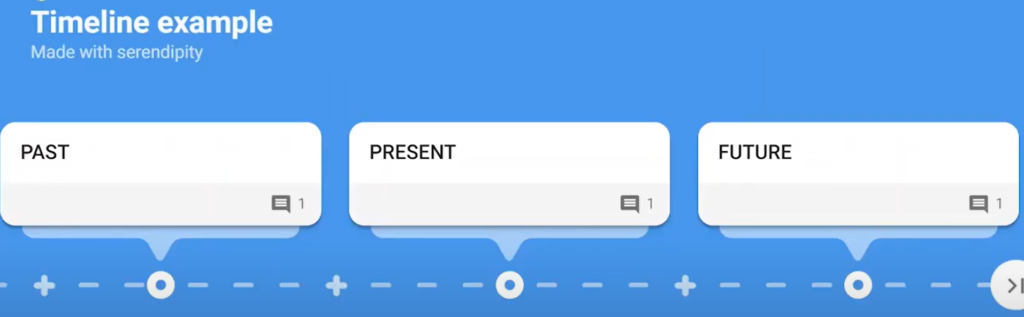
2. The Timeline Padlet
To make a Timeline Padlet, just as before we are going to select Create a Padlet and then select the Timeline option. We have the same options on the right-hand side, but for this lesson idea of mine, select Allow Comments On Posts and then Next. To test our group for their knowledge of the three basic grammar tenses in English we can set up three categories – Past, Present and Future.
We will ask the students to add beneath the categories a sentence or phrase about themselves in the correct tense. This is very useful to get an idea of our student’s understanding of the tenses. Or, we can ask our students to describe their perfect weekend from the first thing that they did to the last thing that they did.
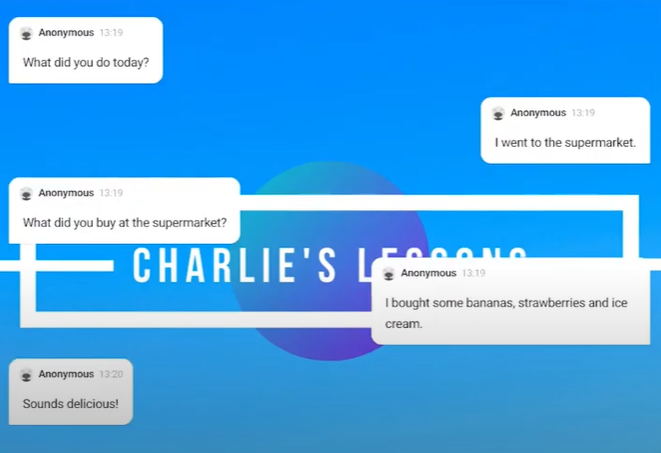
3. The Backchannel Padlet
For this Padlet, we want the students to have a conversation that includes three words – in this example let’s say banana, strawberry and ice cream. The students can come up with questions such as: “What did you do today?” With answers that include those words and continue a conversation to the end. This encourages students who are shy to get more involved and we can encourage them to read out their answers to the class.
Padlet has changed a lot recently and you can check out all the updates right here.
4. The Shelf Padlet
To use Shelf, we select Make a Padlet and pick the Shelf option from the top right-hand corner. For this tutorial, we can just use the automatically selected options and click Next. A great lesson example for this function is that we can ask students to plan our end of year trip. By selecting the + sign underneath each title, we can get the students to add information such as:
- How much it will cost
- How we will get there
- How long we will stay for
- Photos of the place that we would like to visit
- We can also add vocabulary, concepts and ideas
5. The Stream Padlet
Finally, for our fifth and final way to use Padlet, we have the Stream Padlet. Again Make a Padlet and select the Stream option from the top left-hand corner and use the standard settings.
Now we can create digital folding stories with our students. This is similar to a story that we physically write in class where our students answer a question on a blank piece of paper, fold it and pass it onto the next student. But, in this online version, we can ask the students to comment on each question with an invention of their own.
The title could be ‘When they first met, they never imagined that they would become best friends’. The students each answer the question in the title one by one and we set the titles up as the teacher. When I have shared this with students previously, they all add their comments and it is funny to read the end result for the class.
Final thoughts on Padlet
I hope that you found these five great ideas for using Padlet with ESL learners helpful and that it will give you some ideas of your own. I’d love to hear which of the five ideas that we ran through today are you going to use.
Padlet is just one of the many tools I use for teaching online. Check out what others I trust right here.
Or, keep up to date with all of my latest blog posts by following me on Facebook, Twitter, Instagram or TikTok.