In this tutorial for Blooket, I will go through one of the newest platforms out there for assessment. I’ve been playing it all week and my students love it. So in this post I’m going to give you everything you need to play this game today with your students.
A step by step tutorial for Blooket in the classroom
To get set up we go to Blooket.com and sign up. We can use our Google accounts or an email address. When we log into Blooket we begin on the dashboard, if we move from left to right, we begin with play, discover which is to find new question sets, create, if we want to create question sets from scratch, stats which are essentially reports from Blookets you’ve played with your students and finally the market where we can buy new Blooks or new characters. On the left hand side, you will find our sets. You can also mark sets as favourites. You can also set homework and view a history of all the Blookets you’ve played so far. Now if you’re working with the free version of Blooket I’m going to give you some insights into what parts of the platform are still locked off for premium users and what parts you can use as a free user like me. Now for looking at starter users like myself, we cannot create new folders to organize our sets yet. In our history we cannot use the detailed game reports for the Blookets we play.
Tutorial on Question Sets in Blooket
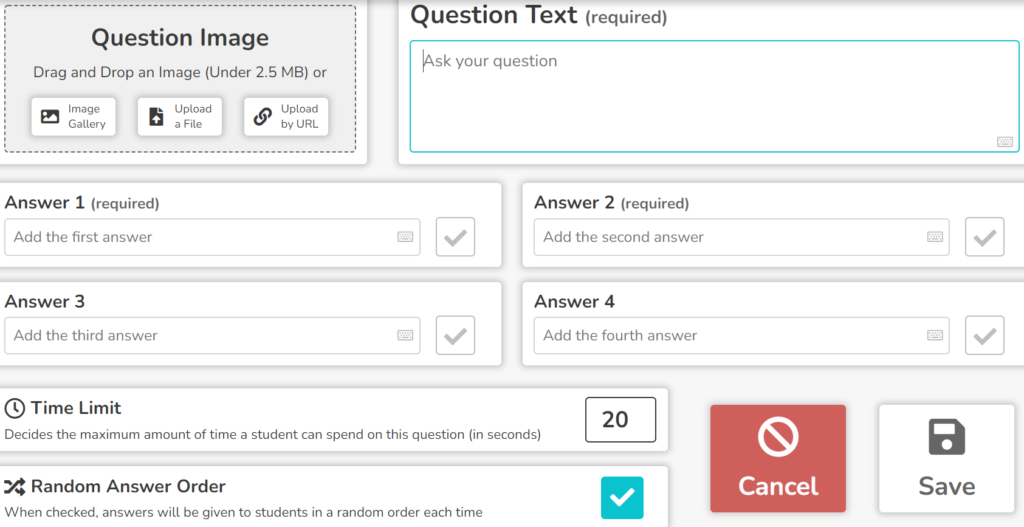
Now, before playing Blooket we’re going to make a question set. To do that we go to create from our dashboard and we include a title. The description and photos serve to help other users find our question sets so it’s useful to do this. We’re now ready to create our set. We’re going to add our first question, include the question text add anywhere between two and four answers. Now it’s very important that we tell Blooket which answer is correct if you do not do that it will not let you save the question. Once we’ve done that we can save the
question and we can save the set.

Now if you don’t want to make a Blooket from scratch you can use the discover function on the website by searching for terms or keywords related to the question sets that you’d like to use in class.
Hosting Blooket game modes
Now hosting a Blooket live game with your students is very much similar to how you host a kahoot or a Quizzes live game. If you’re not sure how that works then go ahead and read my other post that compares Kahoot and Quizizz and then come back and continue with me here. Hosting a game is super easy. We go to the set we want to play, host and we then have to choose a game mode.
Explaining Blooket’s different game modes
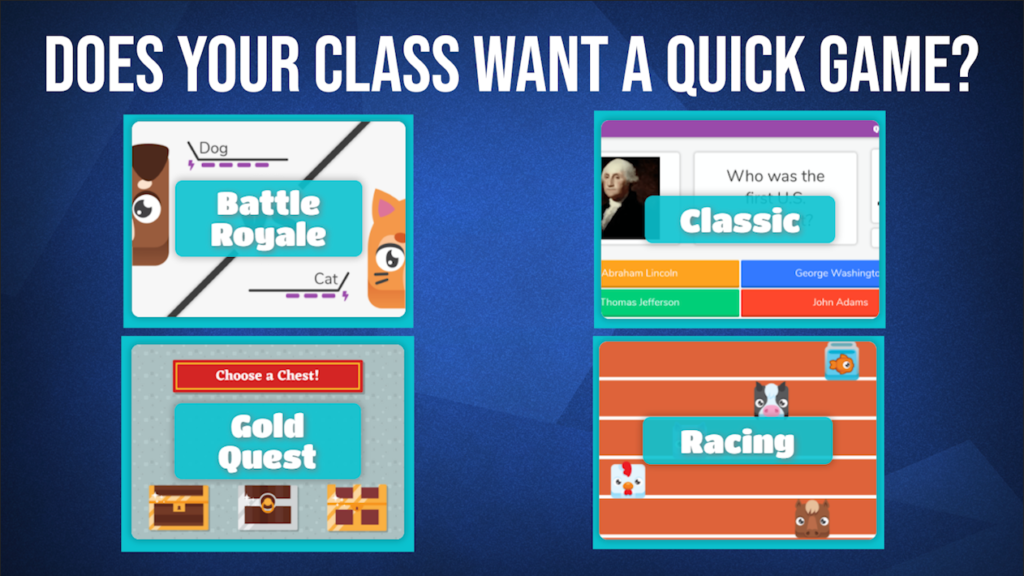
Now I’m going to break these down for you so that you know which one to choose in your next class now to choose the right game mode. Ask yourself, does your class want a quick game? If so these are the four options that I recommend.

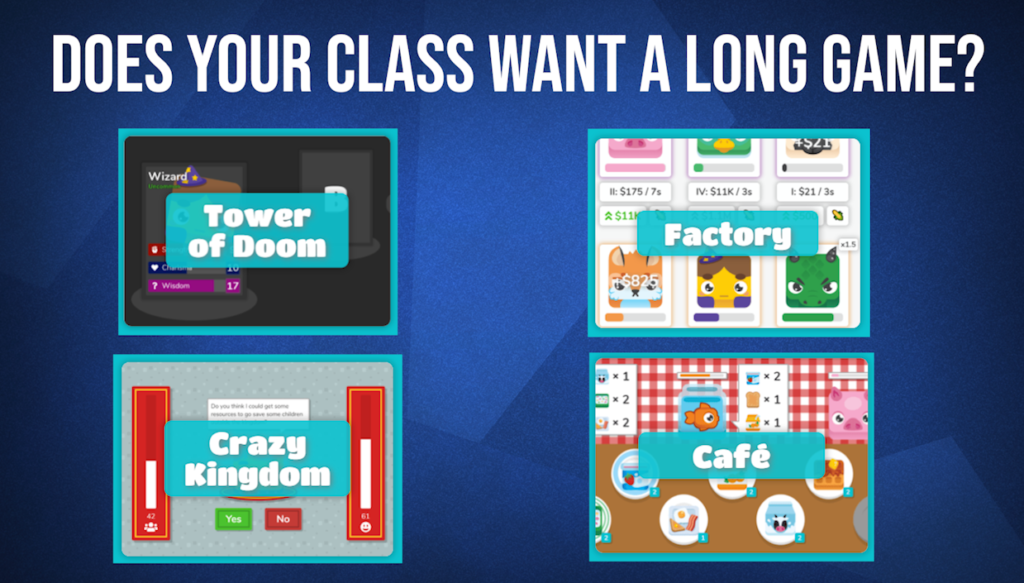
Now, on the other hand if your class wants a long game these are the four game modes you should use.
Now, there are currently four games you can play solo and eight games you can play hosting live. I’m going to try and give you an idea about which ones I’ve played which I think works the best. I have to show you Battle Royale mode because this is the one that the students have been enjoying the most out of all of them when I’ve been hosting live.
Hosting a Blooket game
So, to host it live we just click on it once and go to the host game on the right. Now, we get two options, solo or teams. Teams are really designed for very large classrooms with lots of students so we’ll click on solo. Then we get to choose between one, three five, seven or ten lives for each player at the beginning of the game. Obviously, if you choose 10 then the game’s going to be longer. If you choose one the game’s going to be shorter. I usually like to go between three or five. The students enter by visiting this website and entering a code shown to the teacher. Once the student arrives they’re going to need to put the game ID in. Once the game ID has been entered they press enter , enter a nickname and choose a Blook. In this mode once you have two or more players you can now start the game. Students are given a question to answer. Once the students have submitted all their answers, you will be shown the match results. If a student gets a question wrong they lose a life. This continues until there’s one player left.
How to play Cafe game mode
Now, one of the great things about this new platform is that it has these long-term objectives for the student and this can really help the students to reinforce the language they’re learning in the classroom. Take the game mode cafe for example, this is a great way to revisit language and question sets while maintaining longer term objectives with the students. So, the same way we hosted the battle Royale games it’s the same way we host the cafe game. In this we choose either a time or cash limit. Once we have a student join the game we can press start. Now, when the student begins they appear on the teachers view on the left hand side. What the student needs to do is answer a series of questions to be able to serve the customers. Once a correct answer is given the student gets given some food to give to the customers.
Once this customer receives the food the customer leaves and pays, three dollars in this case, to the student. Now, getting a few questions right enables a student to earn money and go to the upgrade shop. Here they can upgrade through foods or abilities which really make the game a lot of fun when there’s a lot of players involved.
Blooket’s always releasing new game modes and Gold Quest is now officially the most popular at my school. Check out how it works here.
Using Blooket without devices
Now you might be wondering, well, my students don’t have mobile phones or tablets or laptops in class! Which is probably true for a lot of teachers out there, so I’m going to explain how you can play this game without these devices and it’s just as fun. Now, the one thing you are going to need is a projector for the classroom. The four options you’ve got when doing it this way is factory, crazy kingdom, cafe and tower of doom. So to do this we just click solo and choose the game mode we want to play with our students and for the teachers they can save the game and load them again for the next class so the students can pick up where they left off. You can save your games with game modes, cafe and tower of doom.
How to make question sets with Quizlet
Here’s how to make Blooket question sets real quick. This is going to require a combination of Quizlet and Blooket. To do this we go to create, we add a title, and we’re going to click import from Quizlet. On your Quizlet account, search for a quiz that contains text for the answers and the questions, not images. Go to export, copy the text, move back to Blooket and paste the questions into the form. We can either flip the questions and answers, up to you. We add the questions, save our set and it’s ready.
Thanks for reading, I hope you enjoy playing Blooket with your students.

